Monday, April 6, 2015

Perfect draft free spot for proving dough.

Are you like me?

Running round the house with a bowl of dough trying to find a nice warm spot to leave it to rise?

I've used many spots depending on the days temperature. On or in the oven after it's been on. On top of the fridge wrapped in a bath towel. Sitting on the sideboard in a sunny spot. 

I found the perfect spot to keep my bowl or tray of dough to rise that stays nice and warm and is easily moved to keep out of the way so the rest of the kitchen is still usable. 

Inside the esky!

Now I know not many of my readers are Australian so for those of you across the pond it may be called a Chilly bin, cooler box or drinks chiller. 

It's a great spot that prevents drafts, keeps an even temperature and can be moved out of the way and leaves the oven free to be used for other baking. 

Inside I place a hot water bottle filled with hot water from the tap and a thermometer, although this is not a necessity I just like to keep a bit of an eye on how warm it gets. 

I will place my bowl of dough in one side and the hot water bottle on the other, not touching and pop on the lid. 
When the dough has risen and is then shaped into a tray I then place a cooling rack over the hot water bottle to prevent the tray touching the heat directly and place the tray on top. 

This has resulted in great dough each time. 

Give it a go for yourself. 

I also used (as pictured) a polystyrene box with lid instead of the esky when I didn't own an esky yet. 

Tuesday, December 16, 2014

Quirky pot plant

I needed something extra for a Secret Santa gift. 


The recipient is a little quirky in the most endearing way, and I had in mind a dinosaur pot plant. 

However several stores later and even recruiting family and friends I wasn't able to find the right sort of dinosaur for the task. 

I will apologise now, I completely forgot to take pictures of the first quirky pot I made, during its process. So the steps are of the second one I made. 

I picked up an animal pack at a discount store (although a little smaller than what I was wanting) plus a can of spray paint that also sticks to plastic and a succulent plant at the hardware store. 


I used a box cutter/ Stanley knife to cut a piece of the back out. 


This was rather easy but please remember to always cut away from your body just in case the blade slips. 

I sprayed the toy with a couple of coats for paint, left it to dry. 


And planted in the succulent. 


A quirky little plant holder to sit on a desk or windowsill for a person in your life who has a great sense of humour or just young at heart. 

I made another for a friend who was helping me out trying to find a dinosaur as she couldn't quite picture what I was trying to achieve. 

I base coated with the blue then top coated with chrome. Just in case the chrome colour didn't stick to plastic. 

Monday, September 22, 2014

The best pizza dough ever! (in my opinion anyway)

About 18 months ago I went along with my dad to a pizza making class.

You see my dad has a wood fired pizza oven at his place and he was always experimenting with different dough recipes to get one that was great.


He did a lot of research online to find recipes and came across this little pizza place in Melbourne that gave classes. So during the summer break for both of us, off we went to learn for ourselves.


We spent 4 hours there, where we mixed our own dough, let it rise, prepared the toppings, learnt a few methods for kneading dough (14 years spent working with children under 5 years old meant this I was good at - thanks to play-doh)  pressed out the dough into pans, and made our choice of pizza. 


Into the oven it went to bake, and after that we ate them for lunch. 


A few pizzas were made and then baked while we cleaned up and away we went with Take-away pizza and a DVD reminder of the lesson, including the recipe!


This is now my dads go to recipe when making pizza or bread, and up until recently I hadn't made it again.


Don't get me wrong, I'd eaten it lots! but I just never made it at home.


I do prefer it baked in a wood fired oven rather than a regular gas oven, but it was good, no great, so much better than pre-bought pizza bases and the dough can be frozen and it thaws out and bakes as if it was made fresh.


So I thought I'd share this recipe with you, so you can try it for yourselves.


Ingredients:
750 mls warm water
50mls olive oil 
50mls milk
50g fresh yeast
20g salt
1100g flour

Tools:
Food grade bucket- this will be your pizza dough bucket. 

Method:
Add water and yeast into the bucket and mix to dissolve. (We used our hands for all of the mixing)
Add 40mls of oil and all milk and salt and mix until dissolved.
Add the flour and mix by hand for 2-3 minutes.
Add the last 10mls of oil and knead the dough briefly.

The dough will be very sticky, this is just as it's supposed to be. 

Cover the bucket with a clean tea towel and leave for 1 hour.

Using floured scales weigh out
250g for small pizza
300g for medium pizza 
350g for large pizza

Roll each amount on a floured surface into a ball and allow it to rest for 30 mins, cover again with the clean tea towel 

Oil a pizza pan and place a ball of dough top side down onto the pan. 
Push out the dough using your fingers and add which ever are your favourite toppings

Bake for 7 minutes or until golden in a moderate oven or wood fired pizza oven. 

This recipe will make enough for about 6 big pizzas. So for any left over dough, add a small amount of oil into a freezer bag and scrunch it up to spread it around. Add 1 ball of dough, remove as much air as possible and seal the bag. Pop into the freezer until the day you need it and it should be defrosted in the fridge. 
If you want to use the dough the following day place the bucket with the lid on into the fridge after the 1st hour of resting. Roll out and allow to rest as above on the day you use it. 

Now about the bucket. It was what we used at the pizza place and has continued at home. By all means use a large mixing bowl if you prefer. It just frees up a mixing bowl for us and we know no other food flavours will end up in the dough if we only use the bucket for dough. 
After making all the dough balls just leave the bucket and bits of dough to dry. The following morning use a bit of paper towel to wipe out the bucket, a quick wash and it's ready to go again. 
It's much easier and cleaner to wash this way than putting wet dough into the sink and cleaning cloths. 

This dough recipe is also used for breads etc. we had an amazing sundried tomato and basil bread recently but try whatever takes your fancy!


I may be linked up at these parties.

Sunday, July 6, 2014

New favourite Banana Loaf Recipe.


Follow my blog with Bloglovin


Mix together for 2 minutes until pale in colour:
2 eggs
1 cup sugar
1/2 cup canola oil
1 tsp vanilla essence

Add:
1 1/2 cups flour
1 tsp bicarbonate soda
1 tsp baking powder
1/2 tsp salt 

Add:
3 over ripe bananas

Pour into a greased loaf tin sprinkle with raw sugar and bake at 180'C for 55-60 minutes. 

Or into muffin pans baked for 25 minutes.


I often do variations to the muffins depending on other ingredients on hand.
I've added 1/4 caramel chips
Or substituting 1/4 cup canola oil for 1/4 cup coconut oil and adding 1/4 cup shredded coconut. 

Try your own combinations and let me know your favourites!

I may be linked up at these parties.

Tuesday, May 20, 2014

Tim Tam Cheesecake

This past Mothers Day I was keen to bake my mum SOMETHING??

It took a while to come up with an idea, but I got there.


She loves Tim Tam Biscuits.

So I decided to combine these into a cheesecake to make a very decadent dessert for her.


250 g choc ripple biscuits
100 g butter cubed
500 g cream cheese cubed
1/3 cup cream
2 teaspoons vanilla extract
1/2 cup sugar
1 packet Tim Tams (any flavour)

Chocolate curls / more Tim Tams / Maltesers to decorate

Into a food processor, blend the choc ripple biscuits until fine. 

Add the butter and mix until combined. 

Press the mix into a lined spring form pan. 

Place the cubed cream cheese into the bowl of your stand mixer and mix until smooth.

Add the cream, vanilla and sugar and mix until smooth and the sugar is dissolved. 

Stir in the crushed Tim Tams and spread onto the base. 

Cover and chill overnight

Prior to serving decorate as desired. 


In the past any biscuit base I've made used melted butter. But I wanted to give it a try using chilled.  The base turned out perfect! It was soft enough that a spoon got through it easily and not crumbly at all.

Now I didn't think it was sweet, but others who tasted it said it was. So maybe use a little less sugar and try as you go, adding as much as you think it needs.


I may be linked up at these parties.

Tuesday, February 11, 2014

Victoria Sponge

The first recipe I made using my kitchenaid stand mixer was this Victoria Sponge.


I followed the kitchenaid recipe for their gluten free sponge, but since gluten is ok for my family to eat I substituted for regular flour and excluded the gum.

My lesson learnt: never step away from the mixer when whipping cream! It was a little over whipped but not yet butter, as the cake had to travel, it did stand up well to a trip in the car.

And here is my baby, I've had her for 2 years now and she it yet to get a name.

I'm thinking something 1950's housewife'ish???

Any suggestions?


I may be linked up at these parties.

Raspberry and white chocolate muffins

My go to recipe for muffins would have to be this one. 

The recipe was given to me by an old college of mine and it has never failed. 


Raspberry and white chocolate muffins

INGREDIENTS

2 cups plain flour
3 teaspoon baking powder
¾ cup caster sugar
1 cup white choc-bits
1 cup buttermilk or milk
2 eggs
1 teaspoon vanilla extract
100g butter, melted, cooled slightly
1 cup frozen raspberries

METHOD

1. Preheat oven to 180°C. Grease a 12 x ½-cup muffin pan or line with patty cases.

2. Sift flour and baking powder into a large bowl. Stir in sugar and choc-bits.

3. Whisk buttermilk or milk, eggs, vanilla and melted butter in a large jug until well combined. Using a large metal spoon, stir mixture into dry ingredients until just combined. Gently swirl through frozen raspberries (do not over-mix).

4. Spoon mixture into prepared muffin pan. Bake for 25-30 minutes or until cooked when tested with a skewer. Stand in pans for 5 minutes before turning out onto a wire rack to cool. Lightly dust with icing sugar if desired.


I may be linked up at these parties.

Monday, February 10, 2014

Summer holiday is done!

I decided to take January off blogging after December was mighty busy. 

Alongside the usual Christmas fan fair, I made and sold 20 gingerbread houses.

We wrapped up at work the day before my birthday so some much needed celebrating was had to kick off the 'silly season'

We have 3 extended family catch ups over the break to make sure we see most of the family, along with 4 other family birthdays. 

Busy, Busy, Busy.

I went back to work for a week and a bit then took off again for a much needed break. 

A friend and I spent one amazing week in Singapore!

Neither of us had been before, and we spent our days venturing out in the city, shopping, eating, sightseeing and of course some relaxing by the pool. 


I really thought I would have posted a little earlier than this, but of course things went a little awry, when I had a set back with my lower back. So little sitting/standing/walking for me for the last few days. Even tilting up in bed was agony so until now it has been difficult to type anything. 

It's on the mend, and I've been here a few times in the past decade, so as frustrating as it is to be unable to get up and do anything quickly, I know it will get better if I do as I'm told. 
          - let's not mention my goal for this year was to start clinical pilates, yep I'll be looking into classes as soon as my Dr gives the OK. 


Monday, January 6, 2014

Ice cream slice - choose your own flavour

This was my second dessert that I made for Christmas day. 

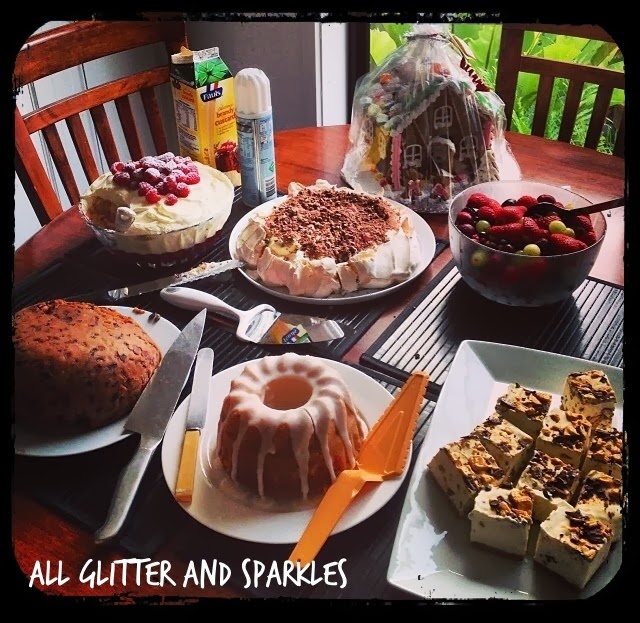
As our day didn't go quite as planned (my father was under the weather so we all stepped up in our own way to ensure our guests were taken care of) I didn't get a chance to take a photo. So this pic is one my sister posted to Instagram. 

Christmas Day dessert table: Top left to right; Trifle, Pavlova, Gingerbread house, Fruit Salad.
Botttom left to right; Plum pudding, Lemon Bundt cake, Ice cream slice.
We had a 'second' Christmas dinner on New Years Day with even more family so my dad could enjoy all the food when he felt better. And I yet again didn't get a pic once it was sliced. 

But either way it was very yum and even better, very simple to make. 

With just 4 ingredients it's a great way to give everyone something sweet to eat after dinner. 

The recipe comes from nestle and just because I rarely follow a recipe directly. Instead of splitting the ice cream between two trays, I heaped up just one. 

So let's get down to it. 
1 packet of malt o milk biscuits
600mls thickened cream
1 tin condensed milk
4 50g violet crumb bars

Line a brownie tray with parchment paper and place a layer of biscuits on the bottom, cut them up to fill the base. 1 tray will not use the whole packet

In the bowl of a strand mixer whip the cream to stiff peaks then add the condensed milk, whisk until thick. 

Crush the violet crumble bars and fold though 3 of them before spreading the creamy mix across the biscuit base. Level off the top and sprinkle the 4th violet crumble bar over the top. 

Cover and freezer for 4 hours or over night. Cut and serve immediately. 


Close up of ice cream slice (apologies for the poor quality)


Now for the second tray I made it using crunchie and peppermint crisp bars. But you could use just about any candy bar that takes your fancy.


I may be linked up at these parties.


Monday, December 23, 2013

Another Christmas filled with gingerbread.

As my last two orders for gingerbread houses left to be devoured by their owners this Christmas, I would like to take this moment to wish everyone a very Merry Christmas and a safe holiday season. 


I'm ready to take a well earned break, with a couple weeks off work and my holiday baking hobby finished I'm all set for a few sleep ins, catching up on some reading, preparing for my trip in January and making the most of the warm summer to get to the beach. 


Take care everyone!


Monday, December 16, 2013

Lemon bundt cake

I was testing out a recipe to make on Christmas Day. 

And it was a winner!


 I will post a link to the original recipe here but I did alter it just a little as my bundt pan is only 16cm.

The stickers on my bundt pan said it needed half quantities of recipes that are required by standard 22cm pans.
And how do you halve 3 eggs?

I rarely eat eggs unless it's French toast or in baking of course, and I really don't like throwing good food away even if it's something I won't eat. 

So below is my version of the recipe suitable for a 16cm bundt pan. Double it for your 22 cm pans or follow the original recipe I'm sure it tasted great too!

Lemon bundt cake for 16cm pans

11/2 cups flour
1 tsp baking powder
1/2 tsp baking soda
1/4 tsp salt
Just under 1 cup sugar
100g soft butter
1 egg
1/2 tsp vanilla extract
1 tbs lemon juice
zest of 1 lemon
1/2 cup milk

Lemon Glaze

1 cup icing sugar
1 tbs lemon juice

Bundt cake

  • Preheat the oven to 180'C.
  • In a mixing bowl, whisk together the flour, baking powder, soda, salt and the lemon zest.
  • Generously grease and flour the bundt pan.
  • In a second mixing bowl, beat together the butter and sugar until light and fluffy.
  • Add the egg, beating well.
  • Add the vanilla and lemon juice and beat well again.
  • Mixing on low speed, add the dry ingredients alternating with milk. Increase the speed to medium and beat for 2 minutes.
  • Pour the batter into the bundt pan.
  • Bake for 30-40 minutes, or until the toothpick inserted in the center comes out clean.
  • Cool the cake for a few minutes in the pan. Place your serving plate over the top of the pan and flip it upside down. Tap the pan gently until the cake releases right. Cool cake completely before glazing.
Lemon Glaze 
  • Place icing sugar in a mixing bowl. Add lemon juice and whisk in. You want thick but still pourable - so it flows down the sides of the cake. 
  • Glaze the cooled cake.


I will be taking 2 desserts to Christmas Day. The second I haven't tested out as one of my sisters made it recently for her friends so I know it works and tastes great (she has been asked to make it again for her friends Christmas Eve celebrations). I will post that recipe as soon as I have made it. 

I may be linked up at these parties.


So excited.......
The Wednesday Roundup

Monday, December 2, 2013

10 minute vanilla slice


A friend of mine posted a link to this recipe via Facebook and I just needed to try it. 

Regular vanilla slice (or snot block as it is usually called around here) is just a little to rich for me. If cake shops made them with half the amount of custard I would be so happy but this is a great alternative. 

It's not an actual custard filling - it's a mix of whipped cream and vanilla pudding which makes it that bit lighter in texture. 

It all comes together very fast and just needs to be chilled until serving. It can last 4-5 days easily stored in the fridge and gets better as the days go on as the biscuit layers soften up a little. 

Ingredients
1 packet lattice biscuits
300 mls cream
1 cup of milk
1 packet instant vanilla pudding
2 cups Icing sugar
Flavour for icing- see options below or make up your own!

Method


Lay biscuits shiny side up in the base of a 22-23 cm square pan.

In a mixing bowl whip cream to soft peaks then add milk and instant pudding mix. Whip for a few minutes until thick and fluffy. Spread the vanilla cream filling on to the biscuits and top with a second layer, shiny side up.


Mix icing sugar with
1/2 tin passion fruit pulp
Or 
1/2 tsp vanilla extract and water 
to make a thick icing that is still pourable and spread over the biscuits. 
Cover and refrigerate for 2-3 hours

Slice before the icing is completely set to prevent cracking and return to fridge until required. 


I made 2 batches of this vanilla slice within 6 days and none went to waste. 

The second batch I didn't slice until the following day and the icing cracked, resulting in less pleasant looking slices but it still tasted great. 

The icing options are totally up to you. I like the passion fruit but friends were raised with their "snot blocks" being vanilla icing either plain white or tinted pink. 

Mix it up and try any flavour you want.  

Mmm I'm thinking chocolate.....


You may notice the boxes in the container. I didn't have a square cake tray so I used my Tupperware cake container and lined it with baking paper. To keep the edges straight I wedged some boxes from the pantry into the gaps and this worked a treat. 
I did purchase a square tray for the second batch. 

I may be linked up at these parties.

Sunday, November 24, 2013

Cornflake biscuits.

I can't believe I've been absent again, not through lack of baking though, but I've not had many successes of late. 

I recently went to a Christmas ornament party, like Tupperware, but with hand made ceramic decorations. I've been to several of these over the years and am slowly building my collection. I'll share my latest additions when they arrive. 

At this party there was a lovely spread of afternoon tea goodies and as the host is not only one of my closest friends but also a very generous person she sent me home with a plate of delicious treats. 

The cornflake biscuits were soooo good. I rationed them out over the week just so they would last a little bit longer. The following weekend I made an attempt to make my own. And ohhhh what a failure. 

I had looked online at several biscuits recipes, and altered a recipe that uses another cereal. I knew from the first batch  coming out of the oven that they just weren't right. I made a slight change to the remaining dough but nope, not the same as the original ones I'd had. 

When I next caught up with my friend I asked if she wouldn't mind asking the lady who had brought the biscuits if she wouldn't mind sharing the recipe. 

And a few days later.....

"You've got mail"

Into my inbox arrived the recipe. 

So, because delicious food should always be shared, here is the recipe to try for yourself. 


Sally's cornflake biscuits. 
125g butter
3/4 cup sugar
1 cup sultanas
1 egg
1 cup self raising flour
Cornflakes

Cream together the butter and sugar until light and fluffy. 
Add the egg and beat well. 
Fold in the sifted flour alternatively with the sultanas. 
Roll teaspoons of the dough in lightly crushed cornflakes. 
Place on a greased baking tray in a moderate (180C) oven for 10 - 12 minutes or until the edges just turn brown. 
Cool on the tray for a few minutes, before transferring to a wire rack. 

Make a cup of tea, sit back and enjoy!

- not a fan of sultanas? replace with chocolate chips!

I may be linked up at these parties.

Saturday, October 12, 2013

Infused vodka

After a recent night out at a local vodka bar, my friends and I were keen to try out making our own infused vodka. 


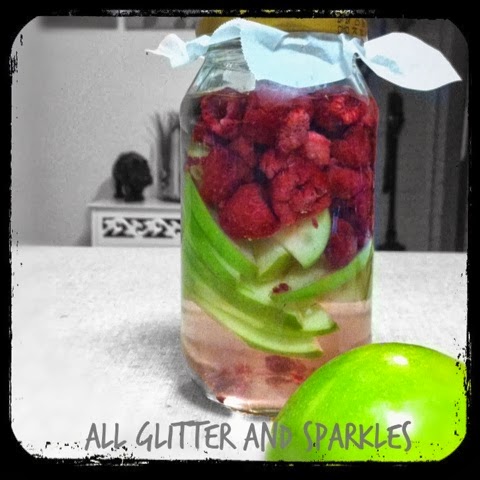
For my first attempt I used raspberries and apple. 


It's just so easy to chop up some fruit stick it in a jar and cover with some good vodka. From all descriptions I found online you just leave it in the pantry and give it a shake twice a day. Test the flavour every couple of days and if need be, replace the fruit after 7 days to increase the flavour or top up with vodka if the flavour is too strong. 

This first try didn't develop a lot if flavour. But there was an apple after taste. Next time I will crush the berries. 

My second test was using a black current puree. The flavour was great after just 5 days, but it wasn't pure black currents, they were in a syrup so the mix does need to be shaken prior to serving. 

Serve straight or with a mixer with a wedge of lime. 


I'm ready for summer!

I may be linked up at these parties.

Sunday, October 6, 2013

Lotion bars


Working in early childhood means washing my hands is something I do all day long, so they get very dry and sore if I don't moisturise them often.

I came across this post (via this post) and bells were ringing... I can do this, and there is no risk of finding liquid lotion squirted through my bag at the end of the day.

I dropped into a local health food store and picked up the ingredients. 


I did substitute the almond oil for avocado oil as nut products are discouraged at my work (and I don't need my hand lotion to be the cause of someone else's allergic/ anaphylactic reaction)

One thing I did forget was to grab some essential oils, I used some dodgy oils I had bought ages ago and they just smell fake. So this batch won't be shared, it's all for me.

Want to make some yourself? Mix equal parts of bees wax pellets, coconut oil and avocado oil (or almond/ jojoba etc) in a double boiler, add any essential oils then pour into moulds of choice and leave to set.


I used a metal mini muffin tin and they popped out fine.

If yours don't set firm enough, just melt them down again and add some extra bees wax pellets.

I wonder if I could mask the fake lime smell if I melted them down again????

Now I keep one of these in my bag and in my desk in little containers and the rest are stored together in sealed container in the fridge (just because the weather is getting warmer here and I'm not sure if that will affect them)

I may be sharing at these parties.