Monday, January 28, 2013

Home Made Cake Stand


Now here is a project that has been on the back burner for quite some time. 

I started it.

Left it to dry in the spare room - forgot about it - finally got myself organised to finish it when *POP* it all came undone.

So it was time to start again.

Across the land of Blog, many different cake stands tutorials are available to be made.

But here is my own tutorial for making a cake display stand from items found at your local discount store.

Apologies as I cannot find where I saved the link to where I originally found the idea.

I started out with a candle stick holder and fluted pie tin that I picked up at discount stores fairly cheap. 

If I remember correctly the candle stick was $1 and the tin $3. It was a bit of a search for a tin that had a complete base as all but this one had a removable base.

I originally tried to use hot glue to stick the candle stick to the tin, but alas it didn't work.

As has my other attempts to use hot glue on glass it just won't stick, I see lots of others who can make it work, but me, nope.

So next I used super glue.  


This is when I left it to dry for......6 months.... wow I just checked the dates on the photo's to get the answer.

During the six months I went and bought the spray paint, but even that didn't motivate me to finish it off.

So just after Christmas when I was packing up my decorations and I saw the cake stand sitting there I thought 'this is the day to finish it'. I picked it up and *POP* off came the candle stick.

OOPS.... the super glue didn't stick either.

On my next trip to the supermarket I picked up some epoxy glue, making sure the packet had both glass and metal on the list of what it will hold.


(and yes that little yellow mark under the candle stick is where I left the super glue tube and it stuck to the tin).

On a sunny summer day (for those not knowledgeable of the Melbourne area we can get all seasons in one day) I set myself up to glue this stand for the last time.

I mixed up the two parts and pressed the candle stick back into the center of the tin, and left that baby to dry.

The following day I made an improvised paint box and sprayed the base first.

Let it dry.


Flipped it over and sprayed the top using short bursts to ensure there were no runny bits.


I do hope to cover it with a varnish or sealer next just to protect it. 

I accidentally dropped a power plug on it and scratched it so it was re-sprayed just to touch it up.


I will be linked up at these fab parties.
mop it up mondays feature

Sunday, January 27, 2013

Saturday, January 26, 2013

mmmmmmmmmmmars bar slice.

Do you ever have one of those days, when you spot one ingredient and think mmm I need to make something with that?

Well that's sort of what happened this morning, but instead of an ingredient I saw Rice Bubbles which are only ever in my pantry when a slice is required. I haven't made any slices since last year but I had grabbed a big box of rice bubbles and they must be used up.

I know there must be heaps of different slice recipes to try that use puffed rice, but this recipe I know by heart and well to be honest I didn't get to eat any of the last mars bar slice I made. It was a request from a friend to make her some.

So with just a few ingredients this yummy slice can be made in a short amount of time.

Ingredients:
3 1/2 cups of Rice bubbles
3 full size mars bars or 9 fun size, chopped. (about 160g)
90g butter
200g chocolate
30g extra butter, chopped
2 tbs icing sugar, sifted


Method:
Grease or line a slice tray. I used a square baking tray this time to have a higher slice.

Melt the chopped mars bars and butter together in a saucepan over a low heat. Mix and mash until it is combined, I don't mind there being a few lumps of nougat left behind.


Pour the melted mix over the rice bubbles in a large bowl and stir to combine.


Press into the lined tray and set aside while you make the topping.


Melt the chocolate in the microwave in 30 second bursts stirring in between.


Then mix in the chopped extra butter and sifted icing sugar. (Most recipes I have seen don't use icing sugar but I like my topping to be chopped easily without snapping the chocolate)


Spread the topping over the slice and make a pattern with a fork if desired. (an Aunt of mine did this on all her slices, so I have carried on the tradition)


Cover and refrigerate 1 hour minimum.

Remove from the tray, slice and serve.


Now this recipe can be adapted to use any of your favorite chocolate bars. I have used Cherry ripes and Snickers bars in the past and other yummy treats can be added when mixing the melted bars into the rice bubbles - mmmm now I'm thinking toffee pieces, chopped nuts or marshmallows or coconut.

Click here to see the fab link parties I will be at.

Saturday, January 19, 2013

Ticket Stub Memory Box.

I found a tutorial over at The Thinking Closet for a ticket stub memory box.

Lauren has written such a great tutorial I suggest you hop over for a look at how it is done.

I took the pics of mine prior to starting my blog so I didn't get the process recorded.

As soon as I saw the end result I knew who I wanted to make one for. Well many people came to mind but as Christmas was approaching fast I had time to make one for a friend and one for me, as I'm sure I will make more for others throughout the year.


The tools and materials were easy enough to find.

I picked up the frames at a discount store. I took Laurens advise and checked out what the frame was made from and I suspected mine was wooden.

Nope.

Got it wrong.

But it was a compressed cardboard so easy enough to drill.

I had paper left over from my stars project, but I did need to borrow the use of my sisters printer as mine is old and out of action.

I made these the day before my friend (whom the second one was for) was coming over.

My frame was one of the first things she commented on when she sat down for a chat.
So imagine her thrill (and mine) to have her unwrap her own.

She said she was curious as to why I had sent her a text asking her colour preferences for picture frames and home decor.....

She loved it, and has hinted at ordering some for others birthdays as well.

 
The purpose of starting my blog was to give credit where credit is due,

So a big THANK YOU to The Thinking Closet for your wonderful inspiration.

I will be linked up at these fab parties:
mop it up mondays 


saving4six


Too Much Time On My Hands


A Marvelous MessSemi Homemade Mom

Friday, January 18, 2013

......blueberries........

Just a quick hello and a pic of some of the blueberries I was able to pick this year.

I don't have the greenest of thumbs so this is the first harvest I have had (it's amazing what a bit of water can do hee hee)

 
Every few days after a good watering more berries are ready to pick, now I haven't had enough after one pick to make blueberry muffins or pancakes but I have enjoyed them straight off the bush, delicious.
 
Off I go to water the lemon tree again (after 6 years of no lemons this year might be the first year for a few)

Saturday, January 12, 2013

Sound of Music.

In my attempt to chic up my home I was finding it hard to find the little things to bring it all together. 

So back I went to spotlight to grab some supplies and home I trot to make myself a set of coasters. My poor glass topped coffee table certainly needed something to save it from those nasty coffee rings and sweating water puddles.

Supplies I used:
6 pre-cut wooden coasters
1 piece of sheet music scrap book paper
Mod podge 
Scissors, pencil and glue brush.

The task is pretty self explanatory.
I flipped the paper and traced the coasters onto the back. 

Cut them out, spread glue on the coasters lay the paper on top, cover it all in glue and wait for it to dry.


On some of the coasters I trimmed the paper back so it was flush with the top and others I pushed the paper on to the curved edge with some extra glue. - these are the ones I prefer.


Now these are not water proof. When used under a glass of iced water on a warm day they do tend to get a bit soggy, but if left alone to dry they bounce back fine - they do not recover well from being chewed by the dog so I am down to just 4 coasters now.


I will be linked up at these fab parties:
mop it up mondays 
Semi Homemade Mom


saving4six


Too Much Time On My Hands

Thursday, January 10, 2013

Starry Night...

Browsing around linky parties I come across so many great ideas.

A little while back I stumbled across Eyes on the source's blog and a great tutorial for paper stars.
These looked easy to do but I just needed a reason to make them.

After much discussion my family decided to host Christmas dinner at home this year, and there was my reason, to decorate the outdoor room with stars.

I found a pack of scrap booking paper at Big W for $12, enough to make 50 stars, with a stop off to grab some more hot glue I was set.

On a quiet evening I sat down with my stack of paper and began to fold.

Now I know I said I was decorating for Christmas, but these stars are large and I don't have a great amount of space for storage. So these stars needed to be versatile. I choose a vintage inspired paper set, thinking it could be used for other events. The stars fit the Christmas theme but the prints could be used for Kitchen teas, Baby Showers etc. and if all else fails they could end up at work where anything goes.

I began by folding all the paper in one go. Corner to corner then side to side.


Opening it up and making cuts from the straight edges to just about half way to centre.


I then folded the cut edge up to the corner fold lines all the way round. 


Repeat 47 more times to have a whole stack of stars just waiting to be glued and assembled - and sore fingers from all that crease making (you would think at some point I would of grabbed something to substitute a bone folder but NO!)


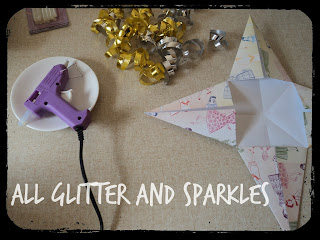
The following day after a good amount of sleep I heated up the glue gun and got ready to stick em.

Running a bead of glue along the edge of the newly folded points I overlapped the two and held for a few seconds until the glue bonded. Repeating again for all four points. On one of the points I would add a strip of curling ribbon to hang the star from later. Once two matching stars were made I placed dabs of glue and pressed those babies together to make a completed 3D star.


There were 24 stars hanging up on Christmas day, I had lots of comments from our guests and a request to use them at an upcoming 30th party. Although I will ensure they are kept to the edges of the room as I forgot we were having such tall visitors on Christmas day and we had to do a lot of weaving to avoid a poke in the head hee hee (I will blame the baubles for weighing down the stars though)

I will be linked up at these fab parties:
mop it up mondays 


saving4six


Too Much Time On My Hands
Semi Homemade Mom

A Marvelous Mess